Monday, January 20, 2014

My New Camera!

Hello world! It has been months since I have posted on here. I've been sucked into my senior year of high school that I haven't had time to create and post anything on this blog. But I'm back with some awesome news! I finally got a new camera! After years of having to use other people's cameras, to being stuck with a very low quality set up, and even stooping down to the level of using my iPhone to take pictures, I now can officially say I have myself a good quality camera! It is a Canon Rebel t3i that I purchased from Target a couple days ago. I have had it for only a little over 24 hours, and I've already gotten lots of use out of it. In this blog post I am just going to show you a few of the pictures I have already taken! My lovely beagles China and Baxter were kind enough to sit still for me half the time so I could take adorable pictures of them. So without further ado, here they are!


Saturday, July 20, 2013

Patriotic Shoes DIY

Hi there! Although 4th of July has come and gone for this year, I always feel like any day is a fine day to be patriotic. However, for the 4th of July I created some shoes and I wanted to show them to you all so you can try them yourself! I took a pair of old plain white Keds sneakers that I had lying around and got to work! I was silly enough to forget to take step by step pictures, so I will explain the process I used in text to help explain what I did.
Here is the finished paint job I did on the sneakers. Red, White and Blue!
I used acrylic paints in the patriotic colors and tape for the stripes.
For the stripes side I started by painting the whole side of the shoe red. After letting that completely dry, I went in order starting from the bottom by taping down a straight line to where the white paint would be applied. I did each stripe one by one, waiting for the first one to dry before I went on to the next one to prevent the paint from peeling off.
Because Im not entirely graceful with a paintbrush, I had my father assist me with the stars side. We first painted the side panel navy blue and waited for it to completely dry. Then my dad went over that with white paint and made stars all over the panel. He decided to make the stars all different sizes, and I like it because it looks alot cuter!
And here is the finished project again!Quick tip: If your shoes aren't super clean, you can use white acrylic paint and paint over the white parts of the shoe to brighten them up and give them new life!
Happy DIY!


Saturday, July 6, 2013

DIY Cheap Drawer Organizer

We all have those disaster-like drawers of makeup and other tools, am I right? In this case, my mother was the culprit of this drawer situation. Tools and make-ups were just everywhere all over the drawer, and half of the stuff was never used anyways! So I decided to come up with a solution to not only organize the supplies that she had, but as well as minimize the amount of products so that we are not hoarding unnecessary items.

So we started with a clean slate. We took everything out of the drawer and cleaned it out so it was pitch perfect ready to be organized!


Then we took all the products and organized them into mason jars and Tupperware to see all that we had separately. It was organized by eye-makeup, mascara, liners (lip and eye), lipsticks, tools, and facial creams. After this step I had my mother go through all of these products and pick out the ones she uses daily or weekly, and the rest we tossed.


Next I had to come up with a plan to organize it. I had the intentions of putting in separators in the drawer (this is were the DIY comes in) so I mapped out a couple of options to accomplish this. Keep in mind you want to put your most commonly used items as close to the front of the drawer as possible, so in my mother's case we put the mascara and facial creams in plain view. We ended up with Option #2 and so here is where I show you the DIY on making a Cheap Drawer Organizer!


DIY Cheap Drawer Organizer
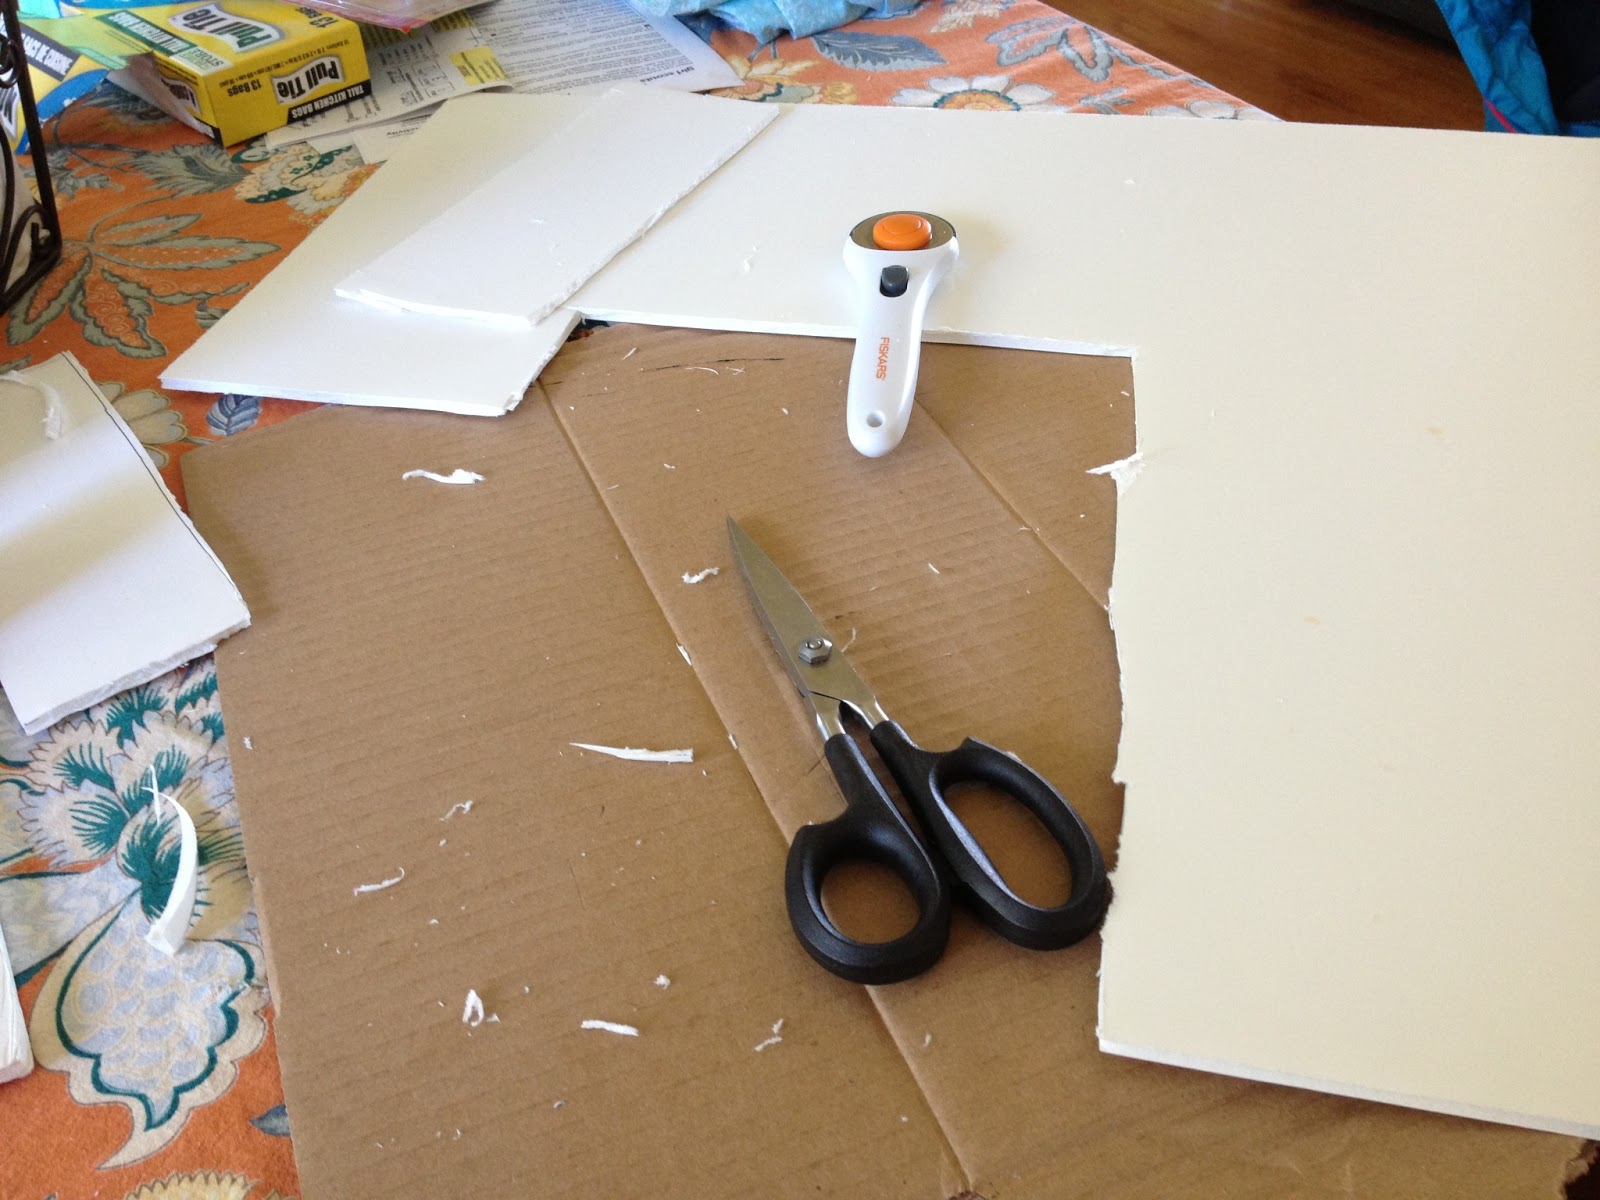
First you are going to purchase a piece of plastic or foam filled poster board. Something that is durable enough that it takes a little effort to bend it. You are going to measure out the length and height for your dividers and cut out your rectangles appropriately. I used two 9 inch long pieces and two 6 inch long pieces for our organizer.
Slide the dividers into place and voila! Brand new and super cheap drawer organizer! Put your make-up into the appropriate sections and you are ready to go! Tip: I used a little less durable material for my dividers so I added a dab of hot glue to the ends of each piece of foam board so I minimize the amount of movement inside the drawer.
Side note: As well as organizing my mother's makeup drawer in our bathroom, I also organized the counter. We have a cute little soap dispenser that used to just sit on the counter by itself and I thought it looked boring so I found this little flower tray we had lying around our house and stuck it underneath it! Not only is it super cute, but it also catches any flyaway hand soap that might get on the counter when someone is washing their hands.

I hope you guys enjoyed this DIY! Let me know if you try this at home! Happy DIY!

Monday, July 1, 2013

DIY Baseball Shoes!

So if you didn't know this already, I am a huge baseball fan. More specifically, a Seattle Mariners fan. So in honor of my crazy obsession with baseball, I created some baseball shoes!

I used some cheap Vans-like shoes that I received for free when helping at a clothing bank which were already in the navy blue color I wanted for the Mariners.
Then I took some regular old scotch tape and lined it around the border made by the stitching around the front section of the shoe to prevent any paint from getting on the area with the laces.

Next, I took some white acrylic paint (I really like the Martha Stewart brand. I used the satin finish paint) and painted the entire front part of the shoe white. This will be the base of the baseball!
Then, I took some red acrylic paint and started making the baseball stitches on top of the white. I made them off center to give it a little more flair and I used this picture as a template for my stitches. You want to remember that each stitch line goes the opposite direction of the other one, so if your stitches on the left side are facing up you want to make sure the ones on the right side are facing down. Its also very helpful to draw a faint line in pencil on top of the paint to give you a guide to where you need to paint the stitches. (do not worry! the pencil marks come off easily with a little bit of erasing!)
Repeat this on the other shoe and ta-da! You have a beautiful pair of baseball toed shoes!
Because I love the Mariners so much, especially player #15 Kyle Seager, I added a little extra on the back of each shoe for good measure. :P
I hope you guys enjoyed this quick little DIY! It only took me about a total of 45-60 minutes to complete this project, and it is nearly free if you already have a pair of sneakers and have some acrylic paint lying around! I hope you all try this, and if you do, please let me know so I can see your beautiful creations! Anyways, I will leave you with this picture of my fabulous shoes at the Pirates vs Mariners game last Tuesday (we lost...rats!).
Happy DIY!


Thursday, June 13, 2013

Hip Injury Prevention


Hi there! So you may not know this, but I am an Irish Step Dancer, and I have done all kinds of dance styles for my entire life. Over the years I have occurred many injuries (luckily none too serious), but one injury I seem to find most prelevant in not only myself, but in other dancers is hip injuries. We dancers are constantly using our hips while dancing, so many of times, our hips will get injured, and it is no fun! The problem is, is that we tend to ignore these injuries because they do not seem as serious, and we end up just walking them off or taking a break from dance. However, these injuries are very serious, and can lead to very serious problems like Osteoarthritis, which would lead to hip replacement surgery. But fret not! There are very simple ways you can prevent these injuries! I put together this video for a science fair project this year, and I wanted to share it with you all so you can watch it and learn some quick and easy ways to help prevent injuries!
Enjoy!!
Hip Injury Prevention In Dancers [click the link!]

Wednesday, June 5, 2013

How To: Create A New Belt Hole!

Ok ladies, let's be honest. We all have belts that we buy just *slightly* too tight so that when we put them on, it squeezes us all in tight and snug? Yeah that's not very comfortable....Or, do we have some belts that we've owned for a while, and suddenly are too small to use? Fret no longer! I have found a simple AND easy solution!! All you are going to need is a Screwdriver (or something similar), a Hammer, and a wood block (or a surface you do not mind getting hit at and scuffed)

You are going to find where you need to place the belt hole and place the screwdriver right on top of it. Bang on the hammer on top of the screwdriver until the screwdriver head penetrates the belt material. You may have to flip over the belt and do this on the backside to get a good hole. 

Stick the belt clasp thing (whatever its called) in the hole and move it around to stretch it out a bit to make it usable.

And voila! You fixed a belt! I would recommend only using this technique on leather or faux leather type belts. Other techniques may need to be used for fabric belts, belts made with glitter etc...But this works great for what I needed! Let me know if you have any questions and comment below if you tried this! 
Happy DIY!

Tuesday, June 4, 2013

Peanut Butter Chocolate Chip Cookies!


Hello! So I have a friend of mine Makayla who is sick (as well as I am), and whenever I'm sick I have this great urge to make cookies...So I decided, why not make some cookies, and bring some to my sick friend! I didn't want to just make a plain old recipe like sugar cookies or chocolate chip, so I decided to twist it up a bit and make a "mash-up" cookie. I found this recipe for Peanut Butter Chocolate Chip Cookies at Indigo Scones' blog here. Because I am terrible at explaining things (especially baking recipes) I am just going to display my visual step-by-step and you can go to Ellen's blog to find the official recipe! Enjoy! (I certainly did)
The Ingredients
Butter and Peanut Butter to the microwave!
Flour and Baking Soda
PB/Butter Mix, Brown Sugar and Reg. Sugar 


Pouring the flour stuff into Mix (egg picture wouldn't upload)

Just knead it! :D
Spooning time :P
Roll the dough in a bit of flour to have it retain shape.
Roll it in less than this...I put too much :P
Into the oven they go! (Batch 1 of 2)
Best time and temp. (12 minutes is ok too)
Tada! <3